
To say that I love bread, is an understatement.
Trust me, I've been TRYING to do the whole paleo clean eating thing in conjunction with my Journey to Thindom, but well as you can already guess, I am not doing very well. Eeeep!
I can resist rice and noodles, but bread is my weakness. *shifty eyes*
I particularly love Breadlicious and Breadtop for their Asian-style freshly baked bread. But they can get really expensive, so sometimes I'll just have to make do with Aldi's wholegrain loaf or I'll just spare my tummy with that extra kilojoules.
I have been wanting to try baking bread, but the idea of having to knead the dough by hand always puts me off. I did consider getting a breadmaker, but I know there is no space in my tiny apartment to fit another machine.
So, you can imagine how happy I was when the Boyfriend's mum offered me her newly-bought breadmaker. I was squealing with excitement inside!
I have been following Christine's recipe blog since ages ago, and I knew right there and then what bread I wanted to bake. It has to be the Hokkaido Milk Toast (北海道牛奶麵包) for its fluffiness! I only really like fluffy bread. :P
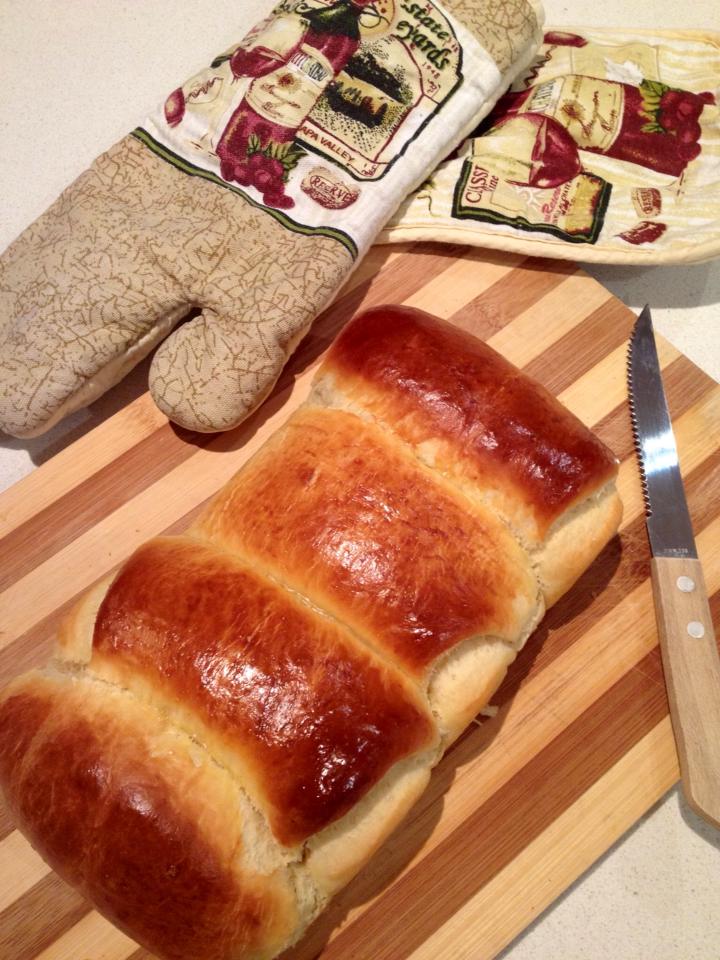
Hehehe, *grins* I can proudly announce that my first attempt at bread baking was a HUGE success!!! :D I followed Christine's recipe to the T, and her step-by-step pictures made the recipe so easy to follow.
Just look at how pretty my Hokkaido Milk Toast is! The Boyfriend gave me a 10/10. I'm a very happy girl! :D

It's so fluffy, I can die!!! It was fresh out of the oven, so soft and extremely yummy, with a rich milky flavour. It is just different to your usual kinda bread, and if you haven't already tried them, you should.
I can't wait to bake bread again! It is tedious and does take up a lot of time for proofing, but trust me, it's so satisfactory just watching the bread bake in the oven!
Needless to add, the amazing smell of freshly baked bread emitting from the oven... YUM!
Also, if you're keen to give bread baking a go, I've share Christine's recipe below - good luck! :)
Hokkaido Milk Toast
Recipe adapted from Christine's Recipes
Ingredients:
Makes two loafs (each loaf tin size - 20.5 x 10.5 x 9.5cm)
- 540g bread flour
- 86g caster sugar
- 8g salt
- 9g full cream milk power
- 11g instant dried yeast
- 86g whisked egg
- 59g whipping cream
- 54g milk
- 184g tangzhong (refer to recipe far below)
- 49g unsalted butter, melted
Method (To make one loaf):
- Add all ingredients (except butter) into a breadmaker, first the wet ingredients (milk, cream, egg, tangzhong), then followed by the dry ingredients (salt, sugar, milk powder, bread flour, yeast).
- Select the “dough” mode (refer to the menu of your breadmaker to select the kneading dough programme).
- When all ingredients come together, pour in the melted butter, continue kneading until the dough is smooth and elastic. The time of kneading in the breadmaker is about 30 minutes.
- Let the dough complete the 1st round of proofing, about 40 minutes, best temperature for proofing is 28C, humidity 75%, until double in size.
 |
| Photo Credit to Christine's Recipes |
- Transfer the dough to a clean floured surface (see picture 1). Deflate and divide into 3 equal portions. Cover with cling wrap, let rest for 15 minutes at room temperature.
- Roll out each portion of the dough with a rolling pin into an oval shape (see picture 2).
- Fold 1/3 from top edge to the middle and press (see picture 3). Then fold 1/3 from bottom to the middle and press (see picture 4).
 |
| Photo Credit to Christine's Recipes |
- Turn seal downward. Roll flat and stretch to about 30cm in length (see picture 5). With seal upward, roll into a cylinder (see picture 6).
- With seal facing down (see picture 7), place in the loaf tins to have the 2nd round of proofing (see picture 8), until double in size. The best temperature for 2nd round proofing is 38C, humidity 85%.
- Brush whisked egg on surface. Bake in a pre-heated 180C (356F) oven for 30 to 35 minutes, until turns brown.
- Remove from the oven and transfer onto a wire rack. Let cool completely.
How to make tangzhong?
Ingredients of tangzhong (The amount is enough to make two loafs):
- 50gm/ 1/3 cup bread flour
- 250ml/ 1cup water (could be replaced by milk, or 50/50 water and milk)
Method of making tangzhong:
- Mix flour in water well without any lumps. Cook over medium-low heat, stirring consistently with a wooden spoon, whisk or spatula to prevent burning and sticking while you cook along the way.
- The mixture becomes thicker and thicker. Once you notice some “lines” appear in the mixture for every stir you make with the spoon. It’s done. You get the tangzhong.
 |
| Photo Credit to Christine's Recipes |
- Transfer into a clean bowl. Cover with a cling wrap sticking onto the surface of tangzhong to prevent from drying up. Let cool.
- The tangzhong can be used straight away once it cools down to room temperature. Just measure out the amount you need.
- The leftover tangzhong can be stored in fridge up to a few days as long as it doesn't turn grey. If so, you need to discard and cook some more. (Note: The chilled tangzhong should return to room temperature before adding into other ingredients.)
6 comments :
Look how beautifully fluffy the bread looks! *drools*
It was!! I was so so happy, you have no idea hehe. Can't wait to make more bread. :)
Which breadmaker do you use?
Hi there, I am using the Sunbeam BM2500 Compact Bakehouse. Here's the link to the product: http://www.sunbeam.com.au/Cooking/Bread-Makers/BM2500-Bakehouse-Compact-Bread-Maker.aspx
Hi! The milk powder can substitute to milk liquid as currently no stock for milk powder.😥 Or can use creamer powder😅
Just omit the milk powder. Don't add extra milk in liquid form.
Post a Comment