I will no longer be updating this blog.
DO CHECK OUT MY NEW BLOG AT WWW.THEBAKEANISTA.COM
Showing posts with label Swiss Rolls. Show all posts

Saturday, March 22, 2014

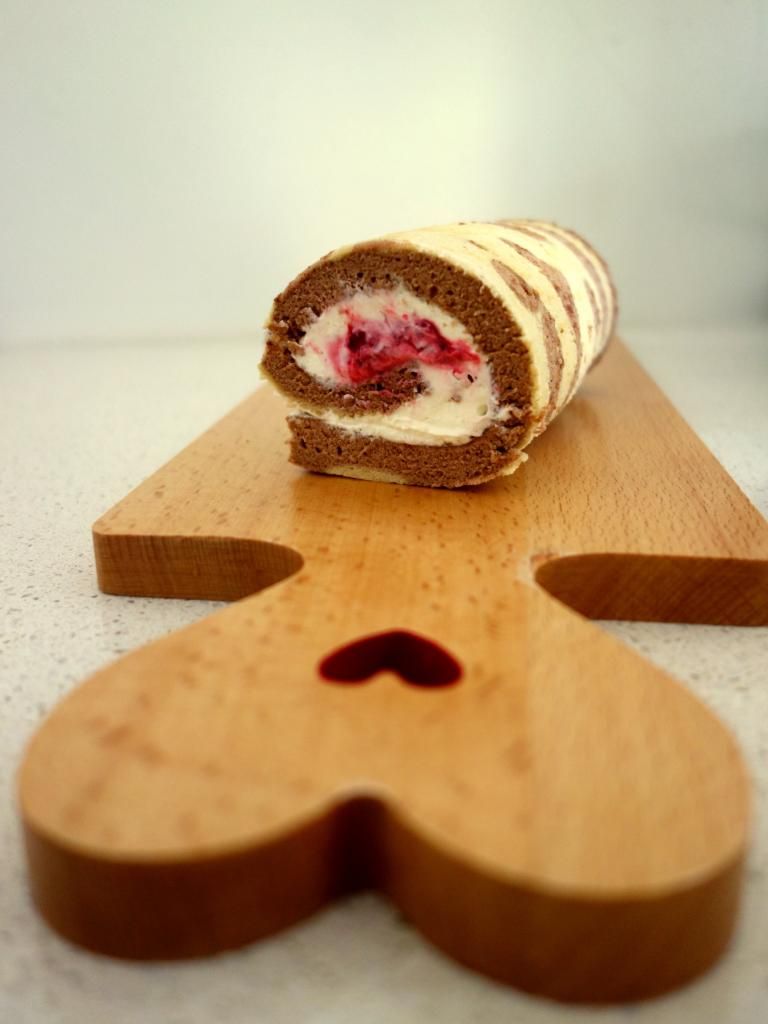
Mocha Deco Swiss Roll

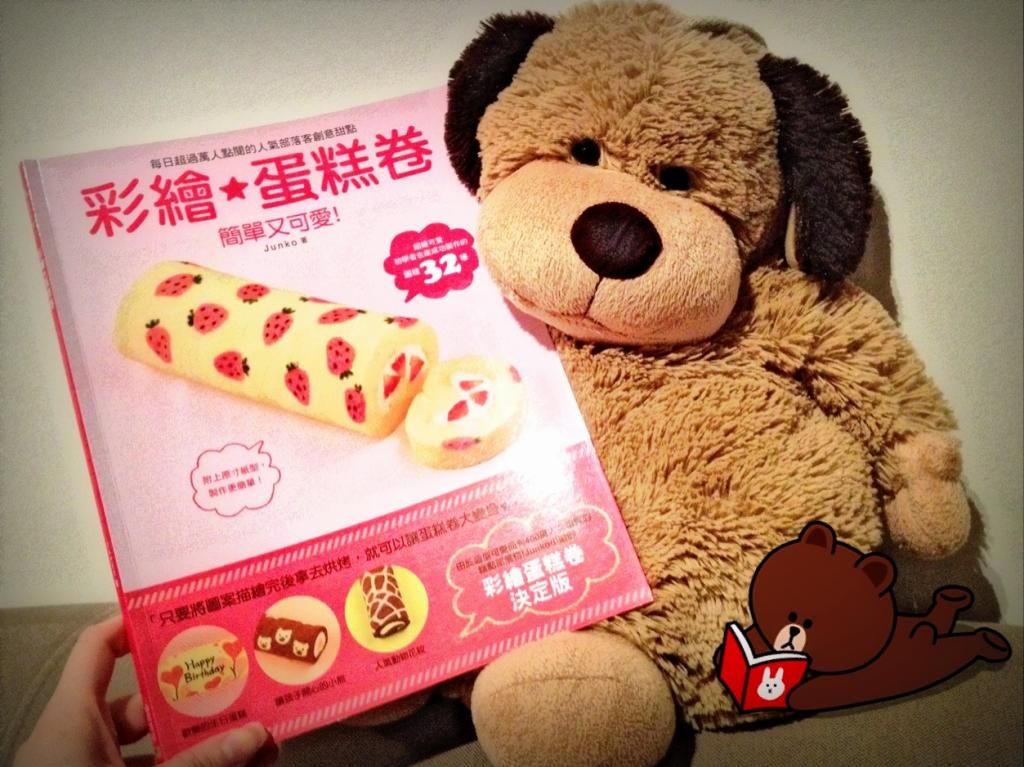
One of my best purchases that I brought back from Malaysia has got to be my new recipe book on deco rolls by Junko.

I was waiting for Mummy one arvo and stumbled upon this book and instantly fell in love with how cute the deco rolls were.

The only problem is that the book was in Mandarin, and I can barely read Mandarin. "I love Swiss rolls and I really want to try baking a deco roll but it's all in Mandarin," I sighed.

So my very kind Mummy dearest actually bought me the book and sat down with me that evening to translate as much as she can for me. *touched* But of course, the step-by-step picture instructions also helped massively, especially without Mummy here in Melbourne. :)

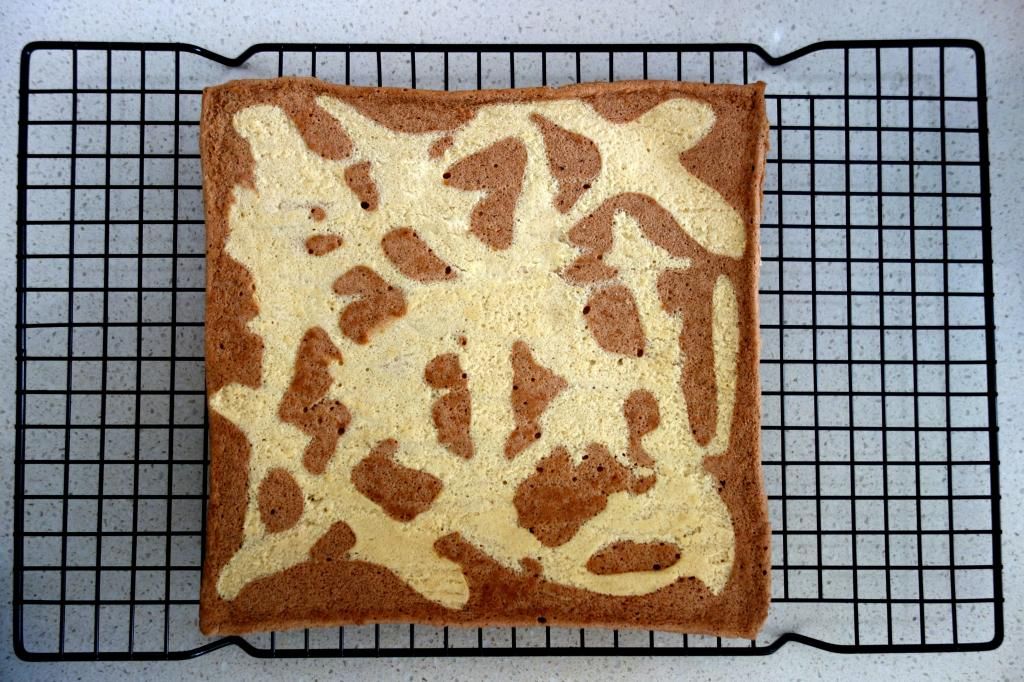
This was my first attempt using the basic recipe with heart shaped deco. Some of the ♥ unfortunately got stuck to the baking paper, so I figured I must not have used enough oil.

So this time around, I was a little more generous with the oil and removed the baking paper as soon as I took the cake out of the oven. And voila, the pattern did not stick to the baking paper!!

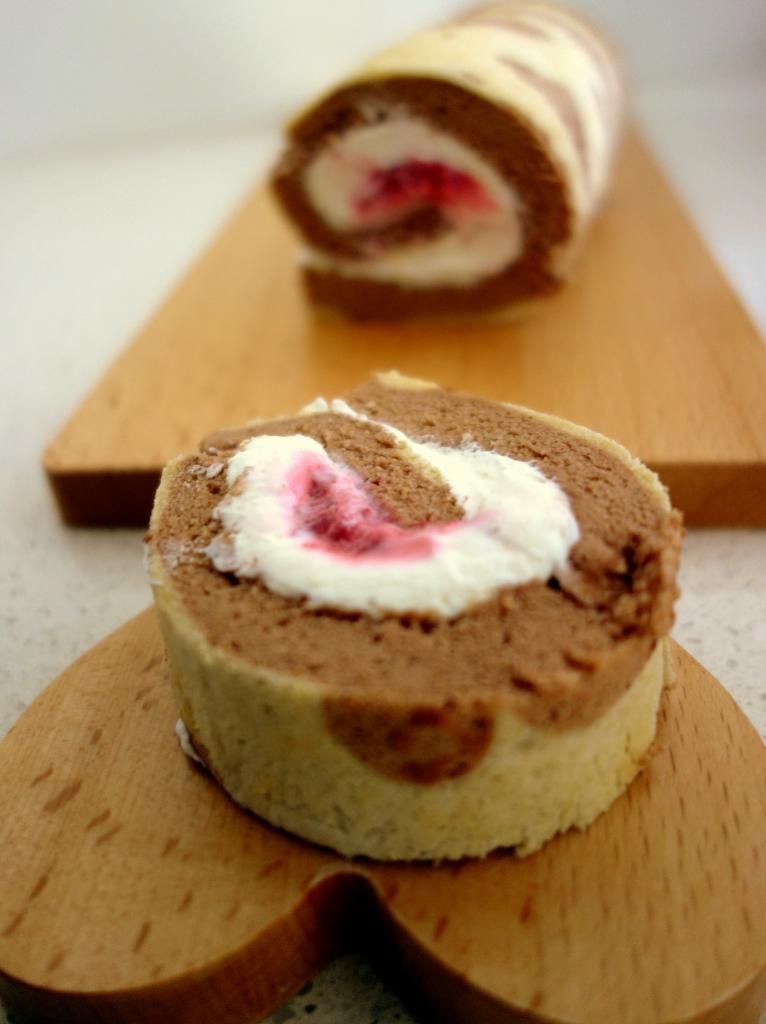
And here's the completed Chocolate and Coffee (therefore Mocha) Swiss Roll!! Really really happy with how it turned out. :D

The Brudder was standing right next to me as I was photographing the cake. Just as I stopped to pause for a little, his greedy hands immediately attacked one of the cut slices. (-__-")

We both had two slices in a row, it was really yummy and not too sweet either which I think is always a plus point.

I tweaked the recipe slightly so I thought best if I save a copy here before I lose that piece of paper with my scribbles. ;)

Mocha Deco Swiss Roll
Recipe by Junko and modified by The Bakeanista

Ingredients 

(A) Egg Yolk Mixture
  • 3 large egg yolks
  • 35g caster sugar
  • 60ml water
  • 40ml vegetable oil
  • 1 tsp vanilla extract
  • 80g cake flour (65g plain flour sifted thrice with 17g corn flour)
  • 10g cocoa powder

(B) Meringue
  • 3 large egg whites
  • 30g caster sugar
  • 1/2 tsp cream of tartar

(C) Coffee Pattern
  • 1 large egg white
  • 1/2 tsp cake flour
  • 1/2 tbsp hot water mixed with 1 tsp instant coffee

(D) Sugar Syrup
  • 10g caster sugar
  • 20ml hot water
  • 1/2 tbsp hot water mixed with 1 tsp instant coffee

(E) Filling
  • 150ml whipping cream, chilled
  • 1 tbsp caster sugar
  • 1/2 teaspoon vanilla extract
  • Fresh fruits of your choice

Method

(A) Egg Yolk Mixture
  1. Preheat the oven to 170°C. Grease and line a 10 x 10 inch sheet roll pan with baking paper. 
  2. Using an electric mixer, beat egg yolks and sugar on medium-high speed until pale and creamy.
  3. Add in water, oil and vanilla extract and mix at low speed until combined.
  4. Sift flour over egg mixture, and whisk at low speed until smooth and well-incorporated. 

(B) Meringue
    1. In another bowl, with a clean set of mixer, beat the egg whites until frothy.
    2. Add in cream of tartar and beat until foamy-like.
    3. Gradually add sugar in (1 tbsp at a time) and beat until glossy and stiff peak form.
    The Bakeanista's Note: I beat the 4 egg whites in the one go, and estimated 1 egg white portion for the coffee pattern.

    (C) Coffee Pattern
    1. Scoop out 4 tsp of egg yolk mixture from (A) into a small bowl.
    2. Stir in 1/2 tsp of cake flour followed by dissolved coffee mixture. Stir in approximately 3 tablespoons of whisked egg whites from (B) and fold until well-combined.
    3. On the prepared cake pan, you may either pipe the pattern or smear on as I did. Bake for 1 minute and remove from oven. Set aside.
    Continuing with (A) and (B)...
    1. Add 1/3 of meringue from (B) into egg yolk mixture from (A). Fold in lightly with a spatula to loosen the mixture, then add the rest of the meringue and fold to incorporate completely.
    2. Pour batter into the prepared pan over the coffee pattern, spreading the mixture evenly and smoothing the top with a spatula. Lightly tap the bottom of the tray on the work surface.
    3. Bake for 14 minutes until the cake has risen slightly and feels springy to the touch. Remove from oven.
    4. Turn sponge straight from oven onto a sheet of baking paper. Peel off baking paper from the bottom of the sponge (very important step!). Cover with baking paper, then a damp tea towel. Set aside to cool completely.
    (D) Sugar Syrup
    1. Dissolve sugar in hot water, then mix in coffee mixture. Set aside to cool.
    (E) Filling
    1. Combine cream, sugar and vanilla extract in a clean bowl. Using an electric mixer, whip cream at medium-high speed until stiff peaks form but cream is still smooth.

    To Assemble
    1. When the cake is completely cool, make shallow cuts along the cake, 2 cm apart, in the crust on top of the cake with a small sharp knife.
    2. Brush sugar syrup over the cake, followed by the whipped cream and fresh fruits. Roll up the cake around the filling. 
    3. Wrap the cake in fresh clingfilm and refrigerate for at least 1 hour before serving.
    Good luck, and enjoy your pretty and delicious Swiss roll! :)

    Wednesday, March 5, 2014

    Filipino Ube Macapuno Cake

    The first I've heard of and seen this amazing Filipino ube cake was at Dahon Tea Lounge. What is an ube cake, you ask? It is a purple yam cake with coconut frosting and it is so very delicious.

    Super miss Dahon's amazing ube cake! :')
    The chiffon layer is fluffy and fragrant; but when paired with the sweet cream cheese frosting and small shredded pieces of the macapuno (like gelatinous coconut flesh), it is out of the world yummeh!

    Dahon unfortunately closed down late last year, and I truly missed this ube cake, so I knew I had to make it. Lucky for me, I did not have to go looking high and low for a recipe as Thanh from I Eat Therefore I Am have tested out a recipe and swears by it!

    The Boyfriend was so super duper nice to drive me all the way to the Pilipino Sari Sari store in Springvale to pick up the key ingredients required (ie. frozen purple yam and ube flavouring) which aren't easily available at other Asian grocery stores.

    The recipe that Thanh has up on his blog makes a 4 layer cake, so I halved it and modified accordingly to make either a two layer 9 inch round cake, or a 13x13 inch layer cake (Swiss roll).

    And tadahhhh, this is the finished product! :) I made it for my cousin's birthday, and it was really good, if I may shamelessly say so myself.


    Ube Macapuno Cake
    Recipe adapted from I Eat Blog and modified by The Bakeanista
    Makes either one 9 inch round cake (2 layers), or one 13x13 inch sheet cake

    Ingredients - Chiffon Cake

    (A) Dry Ingredients
    • 95g cake flour 
    • 1.5 teaspoons baking powder
    • 75g caster sugar
    • 1/2 teaspoon salt

    (B) Wet Ingredients
    • 3 extra large egg yolks (approx. 63g)
    • 1/4 cup vegetable/canola oil
    • 1/4 cup milk
    • 1/4 cup (about 50g) grated ube/purple yam
    • 1 teaspoon ube flavouring
    • 1/2 teaspoon violet food powder/gel paste, optional

    (C) Meringue
    • 3 extra large egg whites (approx. 105g)
    • 1/4 teaspoon cream of tartar
    • 75g caster sugar


    Method
    1. Preheat oven to 170°C. Line one 9 inch round cake tin with baking paper. Do not grease sides.
    2. In a large bowl, combine and mix well all the dry ingredients from (A). Add in the wet ingredients from (B) and beat until smooth and well incorporated.
    3. In a separate bowl, beat the egg whites and cream of tartar from (C) until frothy. Gradually add in the sugar and beat until stiff peaks are formed.
    4. Fold in egg white mixture into wet cake batter until very well combined. Pour cake into prepared pan.
    5. Bake for about 45 minutes or until a skewer inserted into the center of the cake comes out clean. Invert pans onto a wire rack immediately and let cool completely. This will help the chiffon stay tall and high.
    6. Carefully run a thin knife around the sides of pans to release cakes. Using a serrated knife, cut cake in half horizontally. Set aside cake halves for assembly later.
    The Bakeanista's Notes: For the corn flour, you may opt to substitute with 77g plain flour + 22g cornstarch, sifted thrice together.


    Ingredients - Cream Cheese Frosting
    • 1 cups thickened cream
    • 125g cream cheese softened
    • 1/4 cup white sugar
    • 1/2 teaspoon vanilla extract
    • 3oz jar of macapuno (preserved coconut strips)


    Combine the cream cheese, sugar, and vanilla extract in a large mixing bowl and beat until smooth. When the mixture is smooth, slowly pour in the thickened cream and continue whipping until the cream can hold a stiff peak. Don't over beat the frosting as you want it to still be a little bit soft rather than lumpy.


    To Assemble
    1. Drain some of the syrup from the macapuno. This ensures the cake doesn't get soggy and also to prevent the cake from becoming too sweet.
    2. Place one of the cake layers cut side up and spread and level some frosting onto the cake layer until it is about 1/4 inch thick. Scatter the macapuno on top of the whipped cream.
    3. Carefully place the other layer over.
    4. Frost the sides of the cake, spread a layer of frosting over all four layers of cake.
    5. For the birthday writing, I mixed some cream cheese frosting with a little ube flavouring - love the purple and it also tasted amazing!
    6. Dig in and enjoy your yummy ube cake!!! :)

    You may use the similar recipe to make a Ube Swiss Roll cake too! :)


    Or even cupcakes! I think, from memory, this recipe made about 15 medium sized cupcakes. And as you can see in the above picture, it is sooooooo fluffy, I'm gonna die!

    I can't wait to make this ube cake again sometime soon. Good luck for those of you who are going to attempt this recipe, and I hope you enjoy this recipe as much as Thanh and I do. :)

    Wednesday, June 22, 2011

    Pork Floss Roll

    A friend gave me a packet of pork floss roll, and I initially thought of making pork floss bread with seaweed and sesame seed.

    But I was just too lazy to go out to get bread flour (which is not easily accessible here in Melbourne) so I thought, why not make a cake swiss roll to go with the pork floss!

    You might think it's weird combining something savoury like pork floss with cake, but heck no, this was so so so heavenly good. 

    Pork Floss Roll
    Recipe by The Bakeanista

    Ingredients:
    (A)
    6 egg yolks
    100g caster sugar 
    90g plain flour
    25g corn flour
    50ml vegetable oil
    3 tbsp milk

    (B)
    6 egg whites
    60g caster sugar

    (C)
    1 stalk green spring onion, finely chopped into small pieces

    Method:
    1) Preheat oven to 220°C. Line baking paper on a greased 30cm x 30cm x 2cm baking pan.

    2) Mix plain flour and corn flour, then sift thrice. Set aside.

    3) Whisk the egg yolks with 100g sugar until smooth and creamy. 

    4) Stir in milk and combine well.

    5) Sift in the plain flour and corn flour to the mixture. Then quickly add in oil.

    6) In a separate clean bowl, whisk egg whites for a while until bubbles form. Mix in 60g sugar with small amount at a time for 3 times, beat until stiff peaks form.

    7) Fold in egg whites to egg yolks mixture, 1/3 portion at a time.

    8) Pour batter in the lined baking tray and level it. Sprinkle spring onion all over batter and bake for 10-15 minutes, or until golden brown.

    9) Remove from the oven and transfer to a wire rack to let cake cool.

    10) I prefer to peel off the baking paper right away, but you may opt to do so after it has cooled down.

    To make the filling:
    Mayonnaise (I use Kewpie! Yes, I am a Kewpie convert!)
    Pork floss (amount up to personal preference)

    1) Spread a thin layer of mayonnaise over the cake evenly.
    2) Depending on how much pork floss you want, just scatter evenly over 2/3 of the surface

    To ensemble the Swiss roll:
    1) After cooling the cake for a while, and the cake is still warm, use a clean tea towel to pre-roll the cake and let it sit for 10 to 15 minutes. The pre-roll method helps stretch the cake and then can be easily rolled in a round shape. Not to worry, the surface of the cake won’t stick onto the tea towel. 

    2) Turn the surface of cake onto a large paper and spread fillings evenly and roll the cake from the edge of where you have pork floss, ensuring that you end with the 1/3 of the surface without any pork floss filling.

    3) Cut edges to complete. For best results, keep roll folded for 15-20 minutes in baking paper or aluminium foil to set the shape.

    Om nom nom nom! CAN I HAZ THIS... LIKE NOW?!!
    Man, I need another packet of good pork floss!!! *drools*

    Monday, April 25, 2011

    Pandan Swiss Roll

    My neighbour very kindly gave me and my brother each a slice of pandan swiss roll that she bought from the bakery. It made a good breakfast and I wanted more, but was not willing to pay $2 for just a slice of it. And thus, was inspired to bake some to satisfy my cravings.

    Swiss Pandan Rollie 
    Recipe adapted from CR and modified by The Bakeanista

    Ingredients:
    (A)
    6 egg yolks
    100g caster sugar 
    90g plain flour
    25g corn flour
    50ml vegetable oil
    3 tbsp water
    ½ tsp pandan paste
    ½ tsp pandan essence

    (B)
    6 egg whites
    60g caster sugar

    Method:
    1) Preheat oven to 220°C. Line baking paper on a greased 30cm x 30cm x 2cm baking pan.

    2) Stir in pandan paste & essence into water and mix well. Set aside.

    3) Mix plain flour and corn flour, then sift thrice. Set aside.

    4) Whisk the egg yolks with 100g sugar until smooth and creamy. Stir in pandan mixture and combine well.

    5) Sift in the plain flour and corn flour to the mixture. Then quickly add in oil.

    6) In a separate clean bowl, whisk egg whites for a while until bubbles form. Mix in 60g sugar with small amount at a time for 3 times, beat until stiff peaks form.

    7) Fold in egg whites to egg yolks mixture, 1/3 portion at a time.

    8) Pour batter in the lined baking tray and level it. Bake for 10-15 minutes, or until golden brown.

    9) Remove from the oven and transfer to a wire rack to let cake cool.

    10) I prefer to peel off the baking paper right away, but you may opt to do so after it has cooled down.

    To make the filling:
    1/2 cup thickened cream
    4 tsp caster sugar

    1) Chill mixer and mixing bowl in the fridge for 15 minutes.
    2) Beat whipping cream with caster sugar with the chilled electric mixer and bowl until smooth and creamy.

    To ensemble the Swiss roll:
    1) After cooling the cake for a while, and the cake is still warm, use a clean tea towel to pre-roll the cake and let it sit for 10 to 15 minutes. The pre-roll method helps stretch the cake and then can be easily rolled in a round shape. Not to worry, the surface of the cake won’t stick onto the tea towel. 

    2) Turn the surface of cake onto a large paper and spread fillings evenly and roll the cake. Cut edges to complete. For best results, keep roll in fridge before serving.

    Enjoy your Swiss Pandan Rollie with a cuppa tea! :)

    Friday, November 13, 2009

    Mango Swiss Roll

    The soft sponge cake melted in my mouth with the sweet mango filling dancing about inside my mouth. Allow me to say it was so FAN-BLOODY-TASTIC heavenly! I'm such a sweet tooth, I know right! :P

    It was also on that day I made my first Swiss Rollie that I learnt they are best to be consumed within a day, because the next day it hardened a little and didn't taste quite as nice, texture-wise. ;)
    Click on 'OLDER POSTS' for more! :)